|
PennDraw /
Reference
|
public class PennDrawTest {
public static void main(String[] args) {
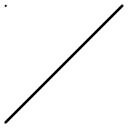
PennDraw.line(0, 0, 1, 1);
PennDraw.point(0, 1);
}
}
| 
|
Note: We've made the line and point thicker so they're easier to see.
PennDraw takes care of creating a window for you as soon as you start drawing. You don't need to do anything special to set up besides putting PennDraw.java in the folder with your program.
PennDraw.line(0, 0, 1, 1); draws a line from near the lower-left corner to near the upper-right corner.
PennDraw.point(0, 1); draws a point near the upper-left corner.
Why aren't (0, 0) and (1, 1) at the actual corners of the window? Most CIS 110 assignments that involve drawing will require you to keep your drawing withing the "unit square" defined by the corners (0, 0) and (1, 1). The margin that PennDraw adds makes it easy to visually verify that you stay inside this square: just draw the unit square (PennDraw.square(0.5, 0.5, 0.5); — see below) and make sure your drawing is completely inside it.
By default, the PennDraw window is 512×512 pixels. To change this, use
PennDraw.setCanvasSize(width, height);
PennDraw.setCanvaseSize() will erase everything in your window, and reset your line width, color, and font. It's best to use it only once at the very beginning of your programming.
PennDraw.setCanvaseSize() to make grading a little bit easier for the TAs.
You can also change the window's coordinate system, which can make it much easier to compute the coordinates for your shapes:
PennDraw.setXscale(left, right);PennDraw.setYscale(bottom, top);PennDraw.setScale(left/bottom, right/top);PennDraw.setScale();
PennDraw.setScale(left/bottom, right/top); is similar to calling both PennDraw.setXScale(left, right); and PennDraw.setYScale(bottom, top);.
PennDraw.setScale(); resets the scale to the default. It is equivalent to PennDraw.setScale(0, 1);
1.2, 3.14159, or -2.71828.
Trying out the scale functions:
PennDraw. Cut and paste the PennDrawScaleTest program below into a blank file in DrJava (or your favorite Java editor), and save it into that folder under the name PennDrawTest.java. Make sure the capitalization matches exactly.
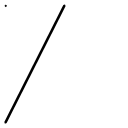
PennDrawScaleTest. When you run it, you should see the figure below (with a thinner line and a smaller point). Note that the line now ends in the top middle of the image: the call to PennDraw.setXscale(0, 2); redefined the right margin to have x-coordinate 2, so the x-coordinate 1 now refers to the middle of the window.
public class PennDrawScaleTest {
    public static void main(String[] args) {
        PennDraw.setXscale(0, 2);
        PennDraw.line(0, 0, 1, 1);
        PennDraw.point(0, 1);
    }
}
| 
|
PennDraw.setXscale(). Each time you make a change, save your file, compile, and run to see the effect it has on the image.
PennDraw.setXscale() with a call to PennDraw.setYscale(). Play with different values to see the effect on the image.
PennDraw.setYscale(1, 0). This should flip your image vertically—it defines the top margin to have y-coordinate 0 and the bottom margin to have y-coordinate 1.
PennDraw.setScale(left/top, right/bottom); and see what it does with different values.
PennDraw.setXscale() and PennDraw.setYscale() in the same program.
These calls adjust the line thickness:
PennDraw.setPenRadius();PennDraw.setPenRadius(radius);PennDraw.setPenWidthInPoints(width);
PennDraw.setPenRadius; resets the line thickness to the default, which is fairly arbitrarily defined as 0.002.
PennDraw.setPenRadius(radius); sets the line width to the value radius. To get a line that is twice as thick as the default, use PennDraw.setPenRadius(0.004);.
PennDraw.setPenWidthInPoints(width); set the line width to width points. (A point is 1/72 of an inch.) Most screens are not properly calibrated for size, so lines may come out thicker or thinner tha you expect. But the thicknesses will at least be consistent with font sizes on your screen.
You can also change the line color:
PennDraw.setPenColor();PennDraw.setPenColor(color);PennDraw.setPenColor(red, green, blue);PennDraw.setPenColor(red, green, blue, alpha);
PennDraw.setPenColor(); resets the pen color to the default (black).
PennDraw.setPenColor(color); sets the color the the specified, named color. color must be one of PennDraw.BLACK, PennDraw.BLUE, PennDraw.CYAN, PennDraw.DARK_GRAY, PennDraw.GRAY, PennDraw.GREEN, PennDraw.LIGHT_GRAY, PennDraw.MAGENTA, PennDraw.ORANGE, PennDraw.PINK, PennDraw.RED, PennDraw.RED, PennDraw.WHITE, PennDraw.YELLOW, PennDraw.BOOK_BLUE, PennDraw.BOOK_LIGHT_BLUE, or PennDraw.BOOK_RED.
PennDraw.setPenColor(red, green, blue); sets the pen color to the specified (red, ,green, ,blue) value. red, green, and blue should be integers (whole numbers) between 0 and 255. For black, set all three to 0; for white set all three to 255. You can easily figure out the correct values using any of the myriad color pickers available on the web. Here's one color picker that works great.
PennDraw.setPenColor(red, green, blue, alpha); set the pen color to the specified (red, ,green, ,blue) value and the specified transparency alpha. All four numbers should be integers between 0 and 1. Set alpha to 0 to make the color fully transparent (invisible), or 255 to make it fully opaque (solid). Anything in between will be translucent.
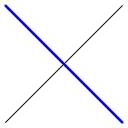
Trying out the line thickness and color functions:
public class PennDrawLineTest {
    public static void main(String[] args) {
        PennDraw.line(0, 0, 1, 1);
        PennDraw.setPenColor(PennDraw.BLUE);
        PennDraw.setPenRadius(0.005);
        PennDraw.line(1, 0, 0, 1);
    }
}
| 
|
PennDraw.setPenColor(), including different named colors, red/green/blue values, and red/green/blue/alpha values. See how each one affects the second line's color.
PennDraw.setPenColor(PennDraw.blue);. Your program will not compile, and you will get an error along the lines of
PennDrawPenTest.java:5: error: cannot find symbol
        PennDraw.setPenColor(PennDraw.blue);
                                     ^
  symbol:   variable blue
  location: class PennDraw
This is a compiler error, and is roughly analagous to a spelling or grammar error in English. Moral: CAPITALIZATION MATTERS!!!
PennDrawPenTest.java:5: error: no suitable method found for setPenColor(double,double,double,double)
        PennDraw.setPenColor(0.5, 0.5, 0.5, 0.5);
                ^
PennDraw.setPenColor(-5, 0, 0);. Your program should compile, but it the second line will not draw, and you will see a run-time error or "exception" along the lines of
Exception in thread "main" java.lang.IllegalArgumentException: amount of red must be between 0 and 255
	at PennDraw.setPenColor(PennDraw.java:435)
	at PennDrawPennTest.main(PennDrawPennTest.java:5)
This is Java's way of saying that you have specified a color value that looks ok at first sight (everything is whole numbers), but is in fact bogus. It's analagous to an English sentence that is grammatically correct and made up of real words, but is total gibberish. ("Green blackbirds cha-cha solemnly from dawn to Australia.")
PennDraw.setPenRadius() and see how they affect the second line's thickness.
PennDraw.setPenWidthInPoints() instead of PennDraw.setPenRadius() and see how it affects the line width.
To clear the window, use:
PennDraw.clear();PennDraw.clear(color);PennDraw.clear(red, green, blue);PennDraw.clear(red, green, blue, alpha);
PennDraw.clear() erases everything on the screen and makes the entire window background white. If you want to set the window background to a different color, you can specify the color by name, or as red, green, and blue values, just like line colors. You can even specify transparency on your background color, in which case whatever was already drawn on the window will show through.
Draw points and lines using:
PennDraw.point(x, y);PennDraw.line(xstart, ystart, xend, yend);
x, y, xstart, ystart, xend, and yend are the coordinates of the point and the start and end of the line. The sample programs in the previous section illustrate their use.
How do I draw a bunch of one-pixel points really fast? When you draw a point, you are actually drawing a little circle whose size depends on the current line thickness. If you want the point to be exactly one pixel in size, you should first call PennDraw.setPenRadius(0);. This will ensure the points are exactly one pixel in size and get draw really fast. (The speed only matters when you want to animate hundreds of points at once.)
Draw squares and circles using:
PennDraw.square(xcenter, ycenter, halfWidth);PennDraw.square(xcenter, ycenter, halfWidth, angle);PennDraw.filledSquare(xcenter, ycenter, halfWidth);PennDraw.filledSquare(xcenter, ycenter, halfWidth, angle);
PennDraw.circle(xcenter, ycenter, radius);PennDraw.filledCircle(xcenter, ycenter, radius);
xcenter and ycenter are the coordinates of the center of the square, not one of its corners!
angle gives the amount of counter-clockwise rotation in degrees
The PennDraw.square() functions draw an outline in the current line color. The PennDraw.filledSquare() functions draw a square filled with the current line color.
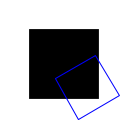
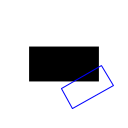
Sample square program:
public class PennDrawSquareTest {
    public static void main(String[] args) {
        // solid black square centered at (.5, .5)
        // with sides of length .6 (half-width of .3)
        PennDraw.filledSquare(0.5, 0.5, 0.3);

        // blue square outline centered at (.7, .3)
        // with sides of length .4
        // rotated 30 degrees counter-clockwise
        PennDraw.setPenColor(PennDraw.BLUE);
        PennDraw.square(.7, .3, .2, 30);
    }
}
| 
|
Draw rectangles using:
PennDraw.rectangle(xcenter, ycenter, halfWidth, halfHeight);PennDraw.rectangle(xcenter, ycenter, halfWidth, halfHeight, angle);PennDraw.filledRectangle(xcenter, ycenter, halfWidth, halfHeight);PennDraw.filledRectangle(xcenter, ycenter, halfWidth, halfHeight, angle);
PennDraw.ellipse(xcenter, ycenter, halfWidth, halfHeight);PennDraw.ellipse(xcenter, ycenter, halfWidth, halfHeight, angle);PennDraw.filledEllipse(xcenter, ycenter, halfWidth, halfHeight);PennDraw.filledEllipse(xcenter, ycenter, halfWidth, halfHeight, angle);
xcenter and ycenter are the coordinates of the center of the rectangle, not one of its corners!
angle gives the amount of counter-clockwise rotation in degrees
The PennDraw.rectangle() functions draw an outline in the current line color. The PennDraw.filledRectangle() functions draw a square filled with the current line color.
Sample rectangle program:
public class PennDrawRectangleTest {
    public static void main(String[] args) {
        // solid black square centered at (.5, .5)
        // with sides of length .6 (half-width of .3)
        PennDraw.filledRectangle(0.5, 0.5, 0.3, .15);

        // blue square outline centered at (.7, .3)
        // with sides of length .4
        // rotated 30 degrees counter-clockwise
        PennDraw.setPenColor(PennDraw.BLUE);
        PennDraw.rectangle(.7, .3, .2, .1, 30);
    }
}
| 
|
PennDraw support circular arcs—arcs that are part of a circle. Specify them by given the center and radius of a circle, and the start and end angles of the arc you want to draw. You can also close the arc with a straight line or chord (a "closed arc"), or by connected the ends of the arc back to the center of the circle (a "pie"):
PennDraw.arc(x, y, r, startAngle, endAngle);
PennDraw.closedArc(x, y, r, startAngle, endAngle);PennDraw.filledArc(x, y, r, startAngle, endAngle);
PennDraw.pie(x, y, r, startAngle, endAngle);PennDraw.filledPie(x, y, r, startAngle, endAngle);
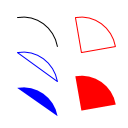
Sample arc program:
public class PennArcTest {
    public static void main(String[] args) {
        // black arc
        PennDraw.arc(0.15, 0.6, 0.3, 10, 100);

        // blue closed arc and filled arc
        PennDraw.setPenColor(PennDraw.BLUE);
        PennDraw.closedArc(0.15, 0.3, 0.3, 10, 100);
        PennDraw.filledArc(0.15, 0.0, 0.3, 10, 100);

        // red pie and filled pie
        PennDraw.setPenColor(PennDraw.RED);
        PennDraw.pie(0.65, 0.6, 0.3, 10, 100);
        PennDraw.filledPie(0.65, 0.1, 0.3, 10, 100);
    }
}
| 
|
Polygons and polylines are closely related: for both you specify a list of coordinates that are connected in order by straight line segments. The difference is that a polygon connects the last point back to the first one to create a closed shape. There are two forms for specifying the points, and you can use whichever form is most convenient in your program.
Form 1:
PennDraw.polyline(x1, y1, x2, y2, x3, y3, ...);PennDraw.polygon(x1, y1, x2, y2, x3, y3, ...);PennDraw.filledPolygon(x1, y1, x2, y2, x3, y3'', ...);
In form 1, the arguments are the alternating x and y coordinates of the points. You can specify as many points as you like.
Form 2:
PennDraw.polyline(xcoordsArray[], ycoordsArray[]);PennDraw.polygon(xcoordsArray[], ycoordsArray[]);PennDraw.filledPolygon(xcoordsArray[], ycoordsArray[]);
In form 2, you specify two arrays of values. The first is a list of the x-coordinates of all the points, and the second is the list of all the y-coordinates.
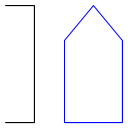
Sample polyline/polygon program:
public class PennArcTest {
    public static void main(String[] args) {
        // three-segment (four-point) black polyline
        PennDraw.polyline(0, 0, 0.25, 0, .25, 1, 0, 1);

        // blue, five-sided polygon
        PennDraw.setPenColor(PennDraw.BLUE);
        double[] xcoords = { 0.5, 1, 1  , 0.75, 0.5 };
        double[] ycoords = { 0  , 0, 0.7, 1   , 0.7 };
        PennDraw.polygon(xcoords, ycoords);
    }
}
| 
|
Drawing images is quite easy:
PennDraw.picture(xcenter, ycenter, filename);PennDraw.picture(xcenter, ycenter, filename, angle);PennDraw.picture(xcenter, ycenter, filename, width, height);PennDraw.picture(xcenter, ycenter, filename, width, height, angle);
Drawing Text:
PennDraw.text(x, y, text);PennDraw.text(x, y, text, ''angle);
PennDraw.textLeft(x, y, text);PennDraw.textLeft(x, y, text, ''angle);
PennDraw.textRight(x, y, text);PennDraw.textRight(x, y, text, ''angle);
text() functions once per line, using different y coordinates.
For example
PennDraw.text(0.4, 0.2, "abc", 30);
Changing the font and size:
PennDraw.setFont(fontName);PennDraw.setFont(fontName, pointSize);PennDraw.setFontSize(pointSize);
PennDraw.setFontPlain();PennDraw.setFontBold();PennDraw.setFontItalic();PennDraw.setFontBoldItalic();
setFontSize() and to turn bold and italic on and off.
Finding out what font names you can use:
The available fonts vary system by system, and it can be a little difficult to figure out what the names to give setFont(). We provide the following function to help you:
PennDraw.listFonts();
PennDraw.listFonts() prints out a list of all the font names you can use to the Dr. Java interactions pane, Terminal, or Command Prompt. Every PC has different fonts installed, so changing fonts is a little dangerous if you want other people to run your program and see the same drawing. (If you ask for a font that isn't installed, Java will substitute another font that may well look completely different.)
PennDraw provides three functions for creating animations:
PennDraw.disableAnimation();PennDraw.enableAnimation(frameRate);PennDraw.advance();
PennDraw.disableAnimation(); turns off animation. Any drawing commands will show up immediately when animation is disabled. (Animation is disabled by default.)
PennDraw.enableAnimation(frameRate); turns on animation at a speed of frameRate frames/second. Common frame rates are 24 (film), 30 (TV), and 60 (HDTV), but you can specify lower or higher frame rates to change the speed of your animation.
PennDraw.advance(). Moreover, PennDraw will ensure that new frames are not shown faster than the frame rate you specified.
What about StdDraw.show()? The StdDraw library on which PennDraw is based uses a function called StdDraw.show() for animation. We have split this into the three functions above for clarity. PennDraw supports StdDraw's show() function to make it easy to convert programs, but we recommend against using it.
PennDraw has very basic support for keyboard and mouse input. It is much less powerful than most user interface libraries provide, but also much simpler.
PennDraw.mousePressed(); returns true or false to indicate whether a mouse button is currently pressed. Use this inside an animation loop to determine if the user is currently clicking.
PennDraw.mouseX(); returns the x-coordinate of the mouse cursor's current position. It uses the same coordinate system as the drawing commands.
PennDraw.mouseY(); returns the y-coordinate of the mouse cursor's current position.
PennDraw.hasNextKeyTyped(); returns true or false to indicate whether the user has typed anything on the keyboard that your program has not yet processed. If the user types lots of characters, they will all be saved in a list for you to read in character-by-character.
PennDraw.nextKeyTyped(); returns the next character in order that the user typed. If the user hasn't typed anything, or you have already processed everything the user has typed (by calling PennDraw.nextKeyTyped()), it will generate a run-time error and your program will crash.
To read in everything a user has typed so far, you need to call PennDraw.nextKeyTyped() once for each character the user has typed. The following example builds a String of everything the user has typed so far, then prints it out:
while (true) {
    String s = "";
    if (PennDraw.hasNextKeyTyped()) {  // make sure there is keyboard input to process
        s += PennDraw.nextKeyTyped();  // read in one character of keyboard input and add it to the end of s
    }
    System.out.println(s);             // print out the string
}
Sometimes you want to ignore everything the user has typed, and only pay attention to what gets typed going forward. To do this, you need to read in everything the user has typed and do nothing with it:
while (PennDraw.hasNextKeyTyped()) {  // as long as there is keyboard input to process
    PennDraw.nextKeyTyped();          // read in one character of keyboard input, but don't save it
}